Blog Post Checklist: 25 Steps For High-Performance Content

If you’re creating content regularly, it means you’re doing the same tasks many times over.
Do some of them tend to slip through the cracks?
Do you jump between them and spend way too much time doing them?
This is exactly the place I found myself in, so I decided to build a checklist I can use every time I’m writing, editing, and publishing.
This list is divided into four main categories:
- Outline and writing (in a notepad and a tool like Google Docs)
- Editing (in a tool like Google Docs)
- Optimization (in a CMS like WordPress)
- Promotion + shareability (on any channel that fits your audience)
I’ve turned this list into a downloadable, printable PDF you can always reference as you work.
If you’re working with a team and add all your tasks to a project management system (Asana, Trello, etc.), you’ll also get a Google Doc so you can copy + paste these checklist items into your task management tool of choice.
Download here:

Sounds good? Let’s make you efficient.
Outline + writing
1. Define a clear ‘why’ behind the post
In other words, can you answer the “What’s in it for me?” (WIIFM) question? Why should your reader care?
Why would they spend their limited time reading your blog post? The alternatives are reading someone else’s blog post, or not reading one at all. What about your blog post makes it worth their while?
I originally adopted the WIIFM approach from CoSchedule, so it only seems fair to share their way of approaching it:
WIIFM: [Insert Post Description + State the Problem This Post Will Solve]
Answering the ‘why,’ or the WIIFM question, makes all the work you’ll do on that blog post more focused and efficient.
2. Work from a primary keyword and a set of related keywords
Primary keyword is a main keyword that you want to rank for; related keywords are those that support it.
In my experience as a writer, working from a primary keyword and a set of supporting keywords is less about hitting certain keyword density and more about staying hyper-focused on a single topic (and reader’s intent).
For example, if you were writing about lead generation for gyms, you wouldn’t want to water down the value of your blog post by adding detailed tips on member retention, payment processing, and customer service.
You could turn each of those topics into a standalone blog post. But for the ‘lead generation for gyms’ keyword, you’d want to make sure you’re diving deep into lead magnets, social media ads, referral programs, and other related subtopics.
Ahrefs’ guide on title tags is a good one to read if you want to know more about picking your primary keyword and related long-tail variations.
3. A clear, specific, transformative headline
Simple, but powerful: can your reader see themselves succeed based on your headline? Can they imagine the specifics?
If not, you’ll struggle to get them to open your blog post.
For example, if you were looking to up your weekly review process, would you rather click on this headline…

…or this one?

For me, the ‘insanely productive week in 14 steps’ paints a very clear picture of where I’ll be if I implement the directions from that blog post. Consider the way you wish your reader to feel after reading your blog post and work it into your headline!
4. Introduction that paints a vivid picture of a problem and a solution
Your introduction should follow suit from your headline. If done well, it will suck your reader into your world because you’re showing them you:
- Know how they feel;
- Have a solution/answer you’ve found and tested;
- Broke the solution/answer down in a way they can learn and/or implement.
Some of my favorite examples of excellent introductions come from Copyhackers:
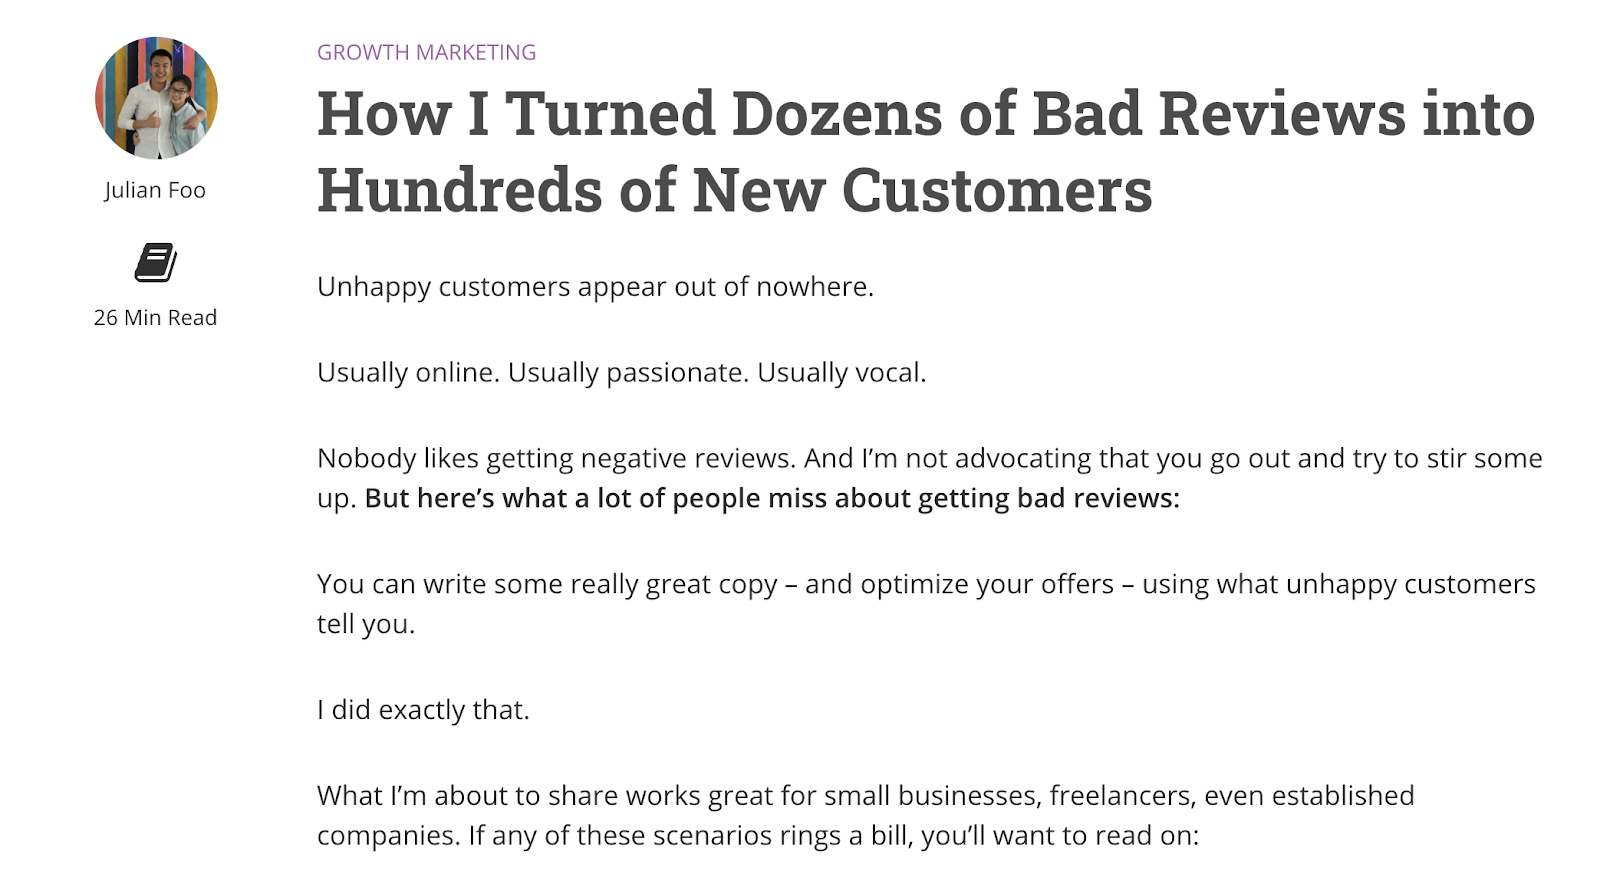
The ‘I did exactly that’ statement, followed by a brief list of what’s covered, is one of the best ways to formulate your blog post introduction.
You’ll find similar examples on Brian Dean’s blog Backlinko.
If you’re struggling to get started or need more inspiration, reading the blog introduction guide from Grow & Convert might help.
5. Subheaders that break the post into logical sections
If you had to quickly sum up your blog post to a stranger in 4-7 bullet points, what would those bullet points be?
This is the same job your subheaders will be doing for your blog post.
When building out the sections of your blog post, here are some of the questions you can ask yourself:
- What is the level of expertise you’re targeting with this post?
- Is each subheader going to be a step?
- Does it make more sense to divide the post by subtopics that build upon each other (for example: what is, how to, why, tips, examples)?
- What does your reader need to learn in each section before they can proceed to the next one?
Check out this guide from Klientboost as a great example of functional, topical subheaders.
6. The CTA is clear and matches the goal of the blog post
What is the goal of your blog post? Here are some potential ones:
- Driving social shares
- Growing your email list
- Generating links and/or media coverage
- Driving customer reviews
If there’s something you want your reader to do once they’ve read your post, tell them what it is.
Clicking through to another blog post? Downloading a free PDF that accompanies your blog post? Sharing it on social media with their favorite takeaway? Add it as an obvious call to action (CTA).
The standard practice for CTAs on landing pages is to only have one clear action throughout. For blog posts, you can be a bit more flexible (although do your best to test this and find what works for you).
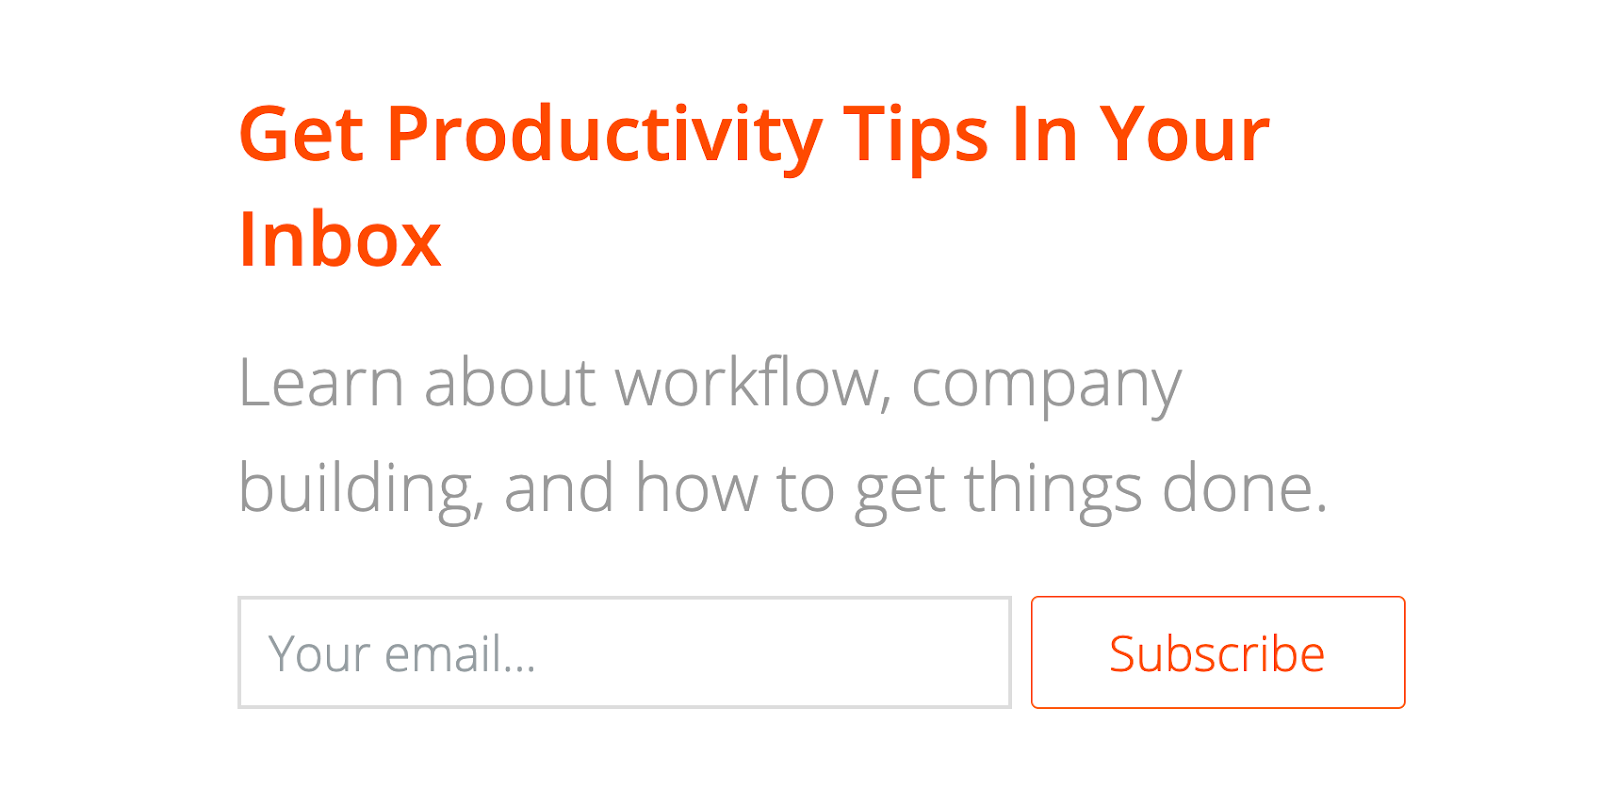
For example, in their post on best to do list apps, Zapier has three different CTAs.
First, integrating an app with Zapier throughout the entire list:

Second, recommended further reading at the bottom:

And third, a sign up form to receive their productivity tips in your inbox below the related reading list:
Which CTAs matter to you? Add them and test them!
Editing
7. Formatting that’s easy on the eyes
There are dozens of formatting tips out there and they’re all valid, but most of them can be boiled down to two core principles:
- Make sure your sentences and paragraphs aren’t too long, and
- Use bullet points and numbered lists when applicable.
By doing this, you’ll make sure your blog post is easy to scan, even on small smartphone screens. If you don’t do any other formatting, make sure you do this.
8. Use images that add value to the text and improve the flow of the story
There’s nothing that drives the value of a blog post down more than random stock photos. I feel this happens for the sake of avoiding long walls of text, but you’ll do a better job with that if you use proper formatting (see previous point).
To add the visual value to the blog post, you can use:
- Screenshots
- GIFs
- Screencasts with a voiceover (using a tool like Loom)
- Graphs and charts
- Graphics with quotes, statistics, and other information
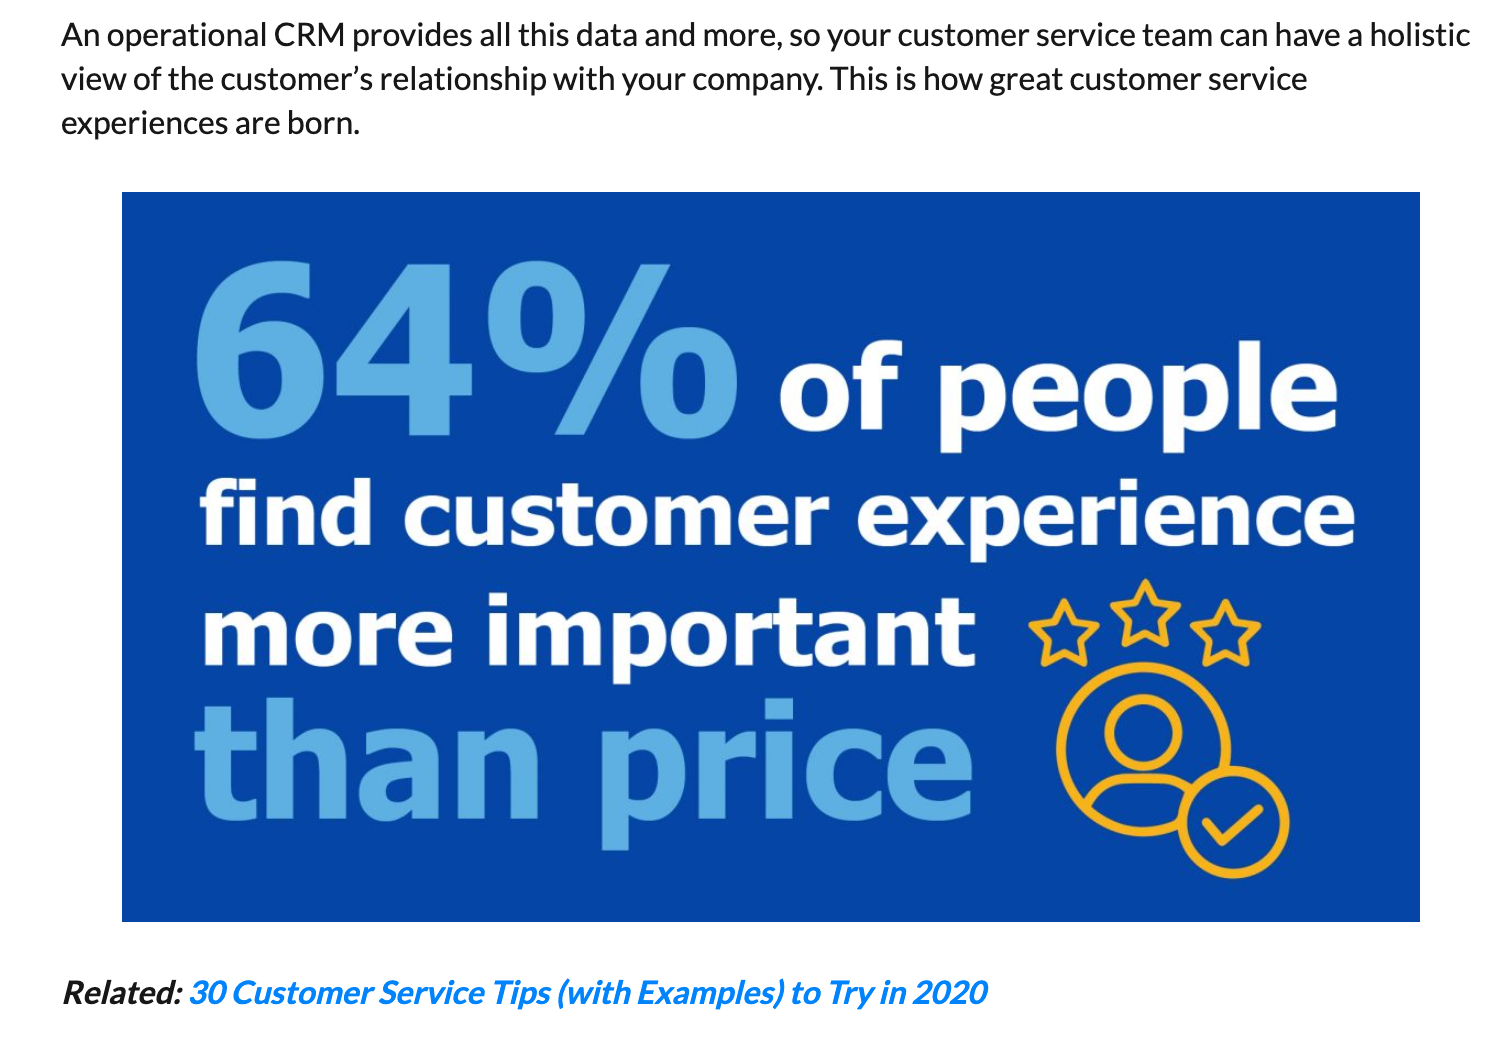
Here’s a great example from one of Nextiva’s blog posts:
An obvious, but important tip: put yourself in your reader’s shoes and ask yourself if you’d really want to see another generic image.
Custom-made, dynamic, relevant graphics will get you a lot further.
9. The post is proofread + free of grammar mistakes
Quite self-explanatory: reduce the occurrence of grammar mistakes and typos as much as you can.
The reason I say ‘reduce their occurrence’ and not ‘make them disappear’ is that I’m very aware that, at times, errors will make their way into a blog post no matter how hard you try. We’re human, and it’s normal.
Obviously, help yourself with tools like ProWritingAid or Grammarly and a great (human) editor.
A note on typos and other errors:
In his book 10x Marketing Formula, Garrett Moon, the CEO of CoSchedule, shared that they don’t go back to their posts to fix typos. Why? Because it’s a distraction that can, at best, improve a result by 10%, and they can use that time to focus on 10x projects.
Check out this podcast interview to hear more about this from Garrett.
10. The post follows your brand and editorial guidelines
What are the main traits of your target audience?
What are your guidelines for headlines and subheaders?
What is your brand voice and tone? Straightforward, playful, conversational…?
How should certain industry words be spelled?
Which companies (competitors) are never to be referenced?
Do you use Oxford commas?
Do you use em dashes (—) and how?
All of these and more are questions your brand and editorial guidelines should answer, and your blog posts should follow.
The reason is simple: consistency in style, voice, and feel across all your content. If you don’t have such guidelines in any form yet, search the internet for guidelines that your favorite brands use and use them to develop your own.
11. Avoid wordiness, fluff, and jargon
To make your blog post as actionable and clear as possible, remove any words that don’t serve that purpose.
If you’re struggling to cut down on fluff and wordiness, you’ll love the book On Writing Well by William Zinsser. In the Clutter chapter, he says: “Examine every word you put on paper. You’ll find a surprising number that don’t serve any purpose.”
Roy Peter Clark’s Writing Tools brings a similar sentiment. In tool 10, Cut big, then small, he says:
- Cut any passage that does not support your focus
- Cut the weakest quotations, anecdotes, and scenes to give greater power to the strongest
- Cut any passage you have written to satisfy a tough teacher or editor rather than the common reader
Finally, try to avoid jargon as much as possible. While it may seem it’s making you sound smarter, using a simpler way to talk about things will help you help your audience more. Your story will be easier to understand, engage with, and relate to.
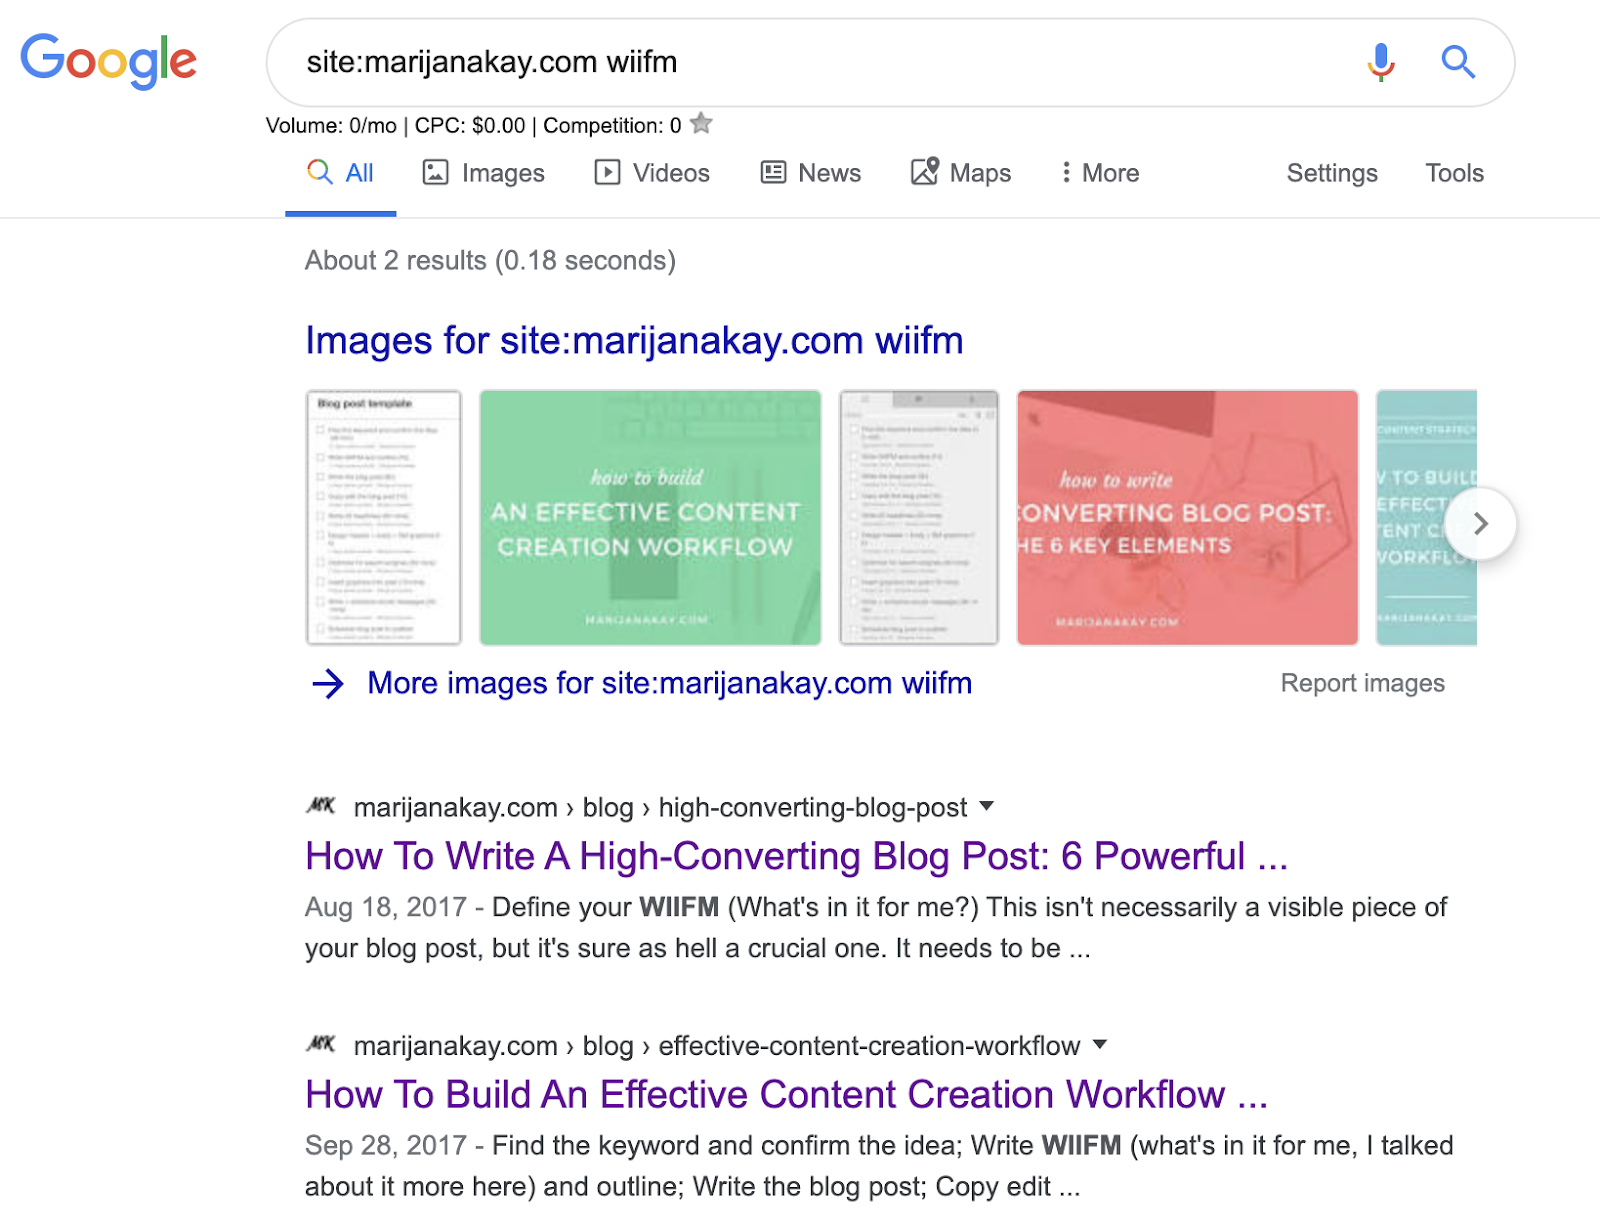
12. Add relevant internal links
Internal links have two main jobs:
- They help your audience keep learning from you about related topics
- They allow search engines to crawl the pages on your website faster (check out this resource from Moz for more on this)
Add internal links naturally throughout your blog posts. To find relevant links easily, search for “site:yourdomain.com term” (for example, site:marijanakay.com WIIFM).
13. Add relevant external (outbound) links
As Brian Dean of Backlinko says in his on page SEO guide, “outbound links to related pages is a relevancy signal that helps Google figure out your page’s topic.”
He also shared that pages with outbound links outrank pages without outbound links, based on a recent study.
Don’t add external links just to mark a checkbox, though. Instead, add external resources that will genuinely help your reader look for further studies, data, and background on the topics you’re covering.

Optimization
14. Proper use of H1, H2, H3 tags in headlines and subheaders
Using headings means wrapping your title and subheaders with short pieces of HTML code. Pretty much every CMS (e.g. WordPress, Squarespace) makes it easy to add without actual coding.
The correct use of these tags makes the structure of your blog post better. Simple as that.
Here’s the ideal structure:
- H1: Blog post title
- H2: First subheader
- H3: Section 1 of first subheader
- H3: Section 2 of first subheader
- H2: Second subheader
- H3: Section 1 of second subheader
- H3: …
- H2: Third subheader
- H3: …
- H2: Conclusion
- H2: First subheader
Of course, you don’t need to go as deep as H3 or further if your blog post’s depth and flow work perfectly with just essential H2 subheaders.
15. The URL is short and SEO-friendly
The default blog post URLs that your content management system generates for you are usually not ideal. Think: dates, category names, random letter combinations…
Make your blog post URL short and packed with your essential keywords. It’s a simple step, but a powerful one—your URL will stand out in search results as an obvious choice.
16. The headline starts with the primary keyword (if possible)
This is optional, but something to consider if it fits your style, topics, and industry.
Many clients I’ve worked with swear by this approach as it sets them apart from their competitors and fuels their organic search efforts.
Their headlines look something like this…
YouTube channel description: 5 ways to stand out
…or this:
Sales management definition, process, tips and strategies
According to some tests run by the folks at Moz, keywords closer to the beginning of your title tag may have more impact on search rankings. If it fits your writing style, test it out for yourself.
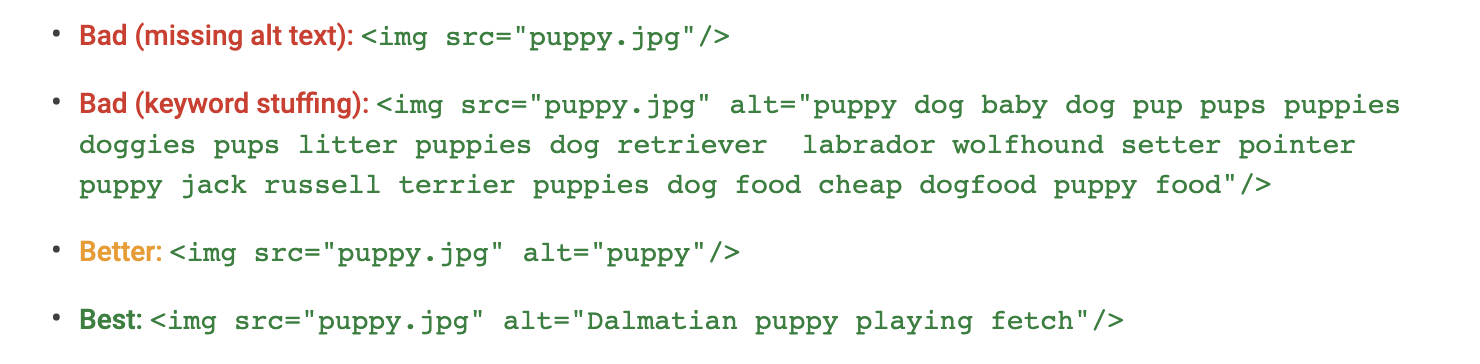
17. Images are optimized: file name and alt text
To be able to ‘read’ images, Google needs a bit of our help. You can provide it by adding relevant, clear, keyword-based:
- Image file name
- Alt text
- Captions
As always, avoid keyword stuffing. Here are bad and great examples coming from Google themselves:
18. Meta description is clear and click-enticing
Make sure your meta description is showing why your ideal reader should pick your blog post over anyone else’s.
Some of my favorite examples of effective meta descriptions come from CXL. They’re short and to the point, but they also leave a curiosity gap.

Promotion + shareability
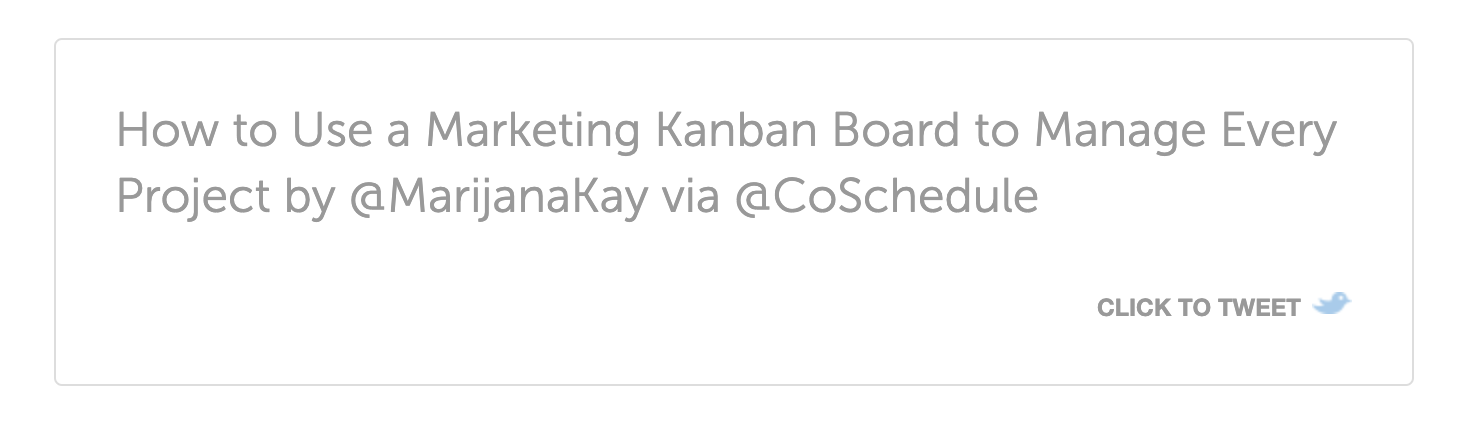
19. Add shareable elements like click-to-tweet and graphics
Is your blog post easy to share? Or does your reader have to go out of their way to do so?
Use simple features like click-to-tweet (on clicktotweet.com or with CoSchedule’s WordPress plugin) to make tweeting simple.
Here’s an example from one of my recent blog posts from CoSchedule:
You can also add graphics (similar to the example from point #8) that are easy to share on social media. If your audience is on Pinterest, make sure to add vertical images for easy pinning.
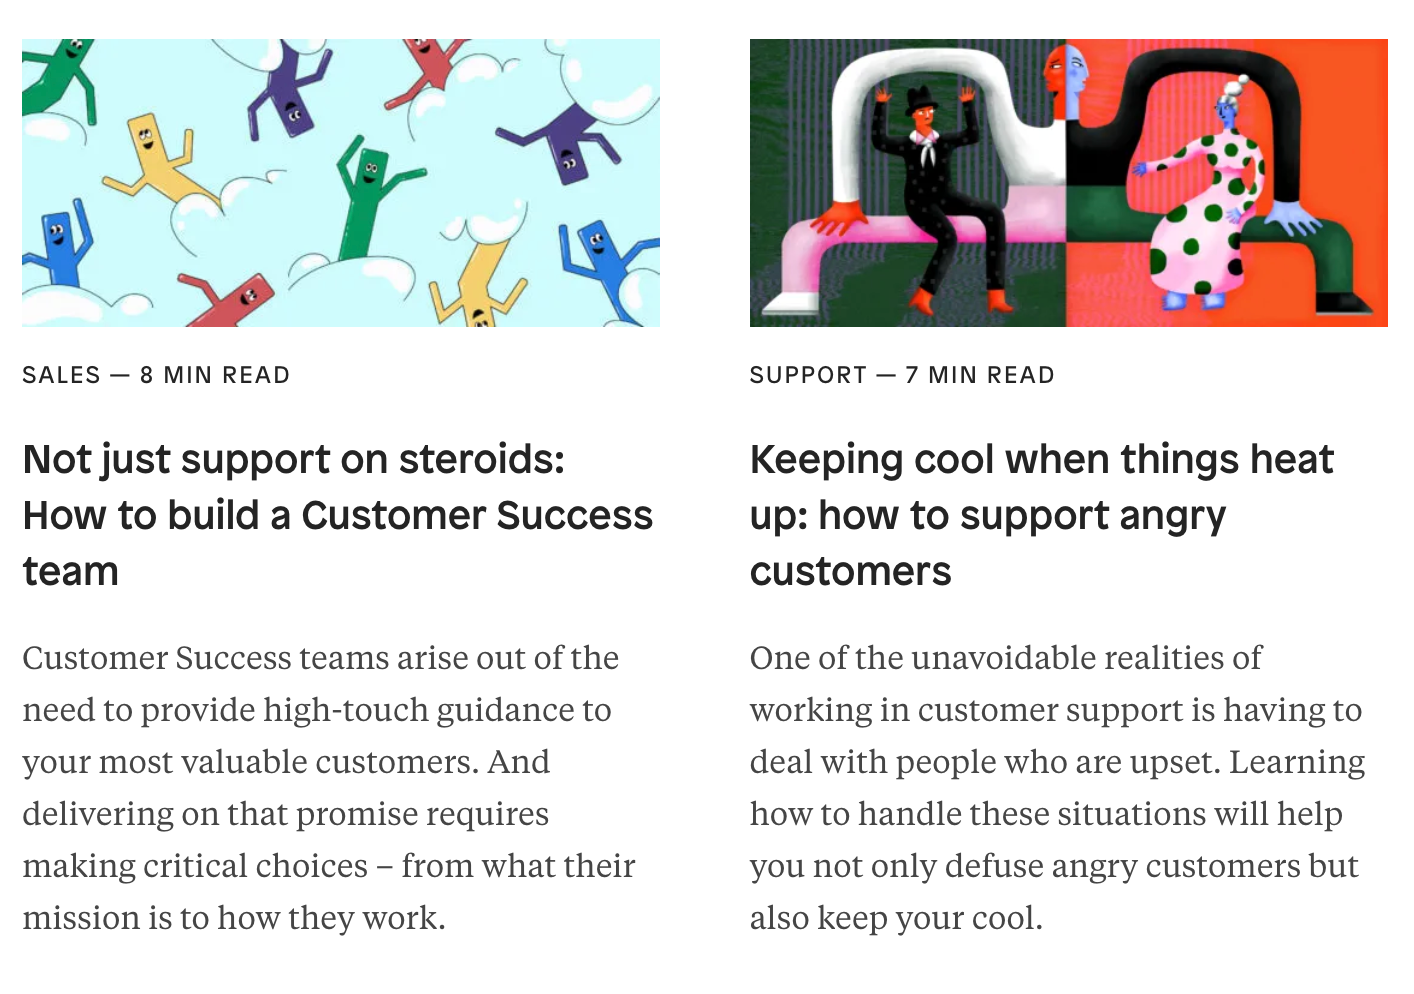
20. Add a featured image to the post (visible on social media)
If someone shares your blog post on social media using native sharing features (think Twitter and Facebook), what image will show up?
To avoid having a random image, create one with your blog post title or some other, recognizable brand elements.
Here’s a great example from the Inside Intercom blog:
21. Update relevant existing posts to link to this post
Search through your past blog posts for any mentions of the topic and subtopics mentioned in your new blog posts. Then, add the link to your new blog post to those old blog posts.
For example, if I’m publishing a new blog post on content marketing analytics, I’d head to Google and search for:
- Site:marijanakay.com analytics
- Site:marijanakay.com data
- Site:marijanakay.com reports
- Site:marijanakay.com testing
…you get the point. The goal here is to make the most of the traffic your older blog posts are receiving and send it to the new one.
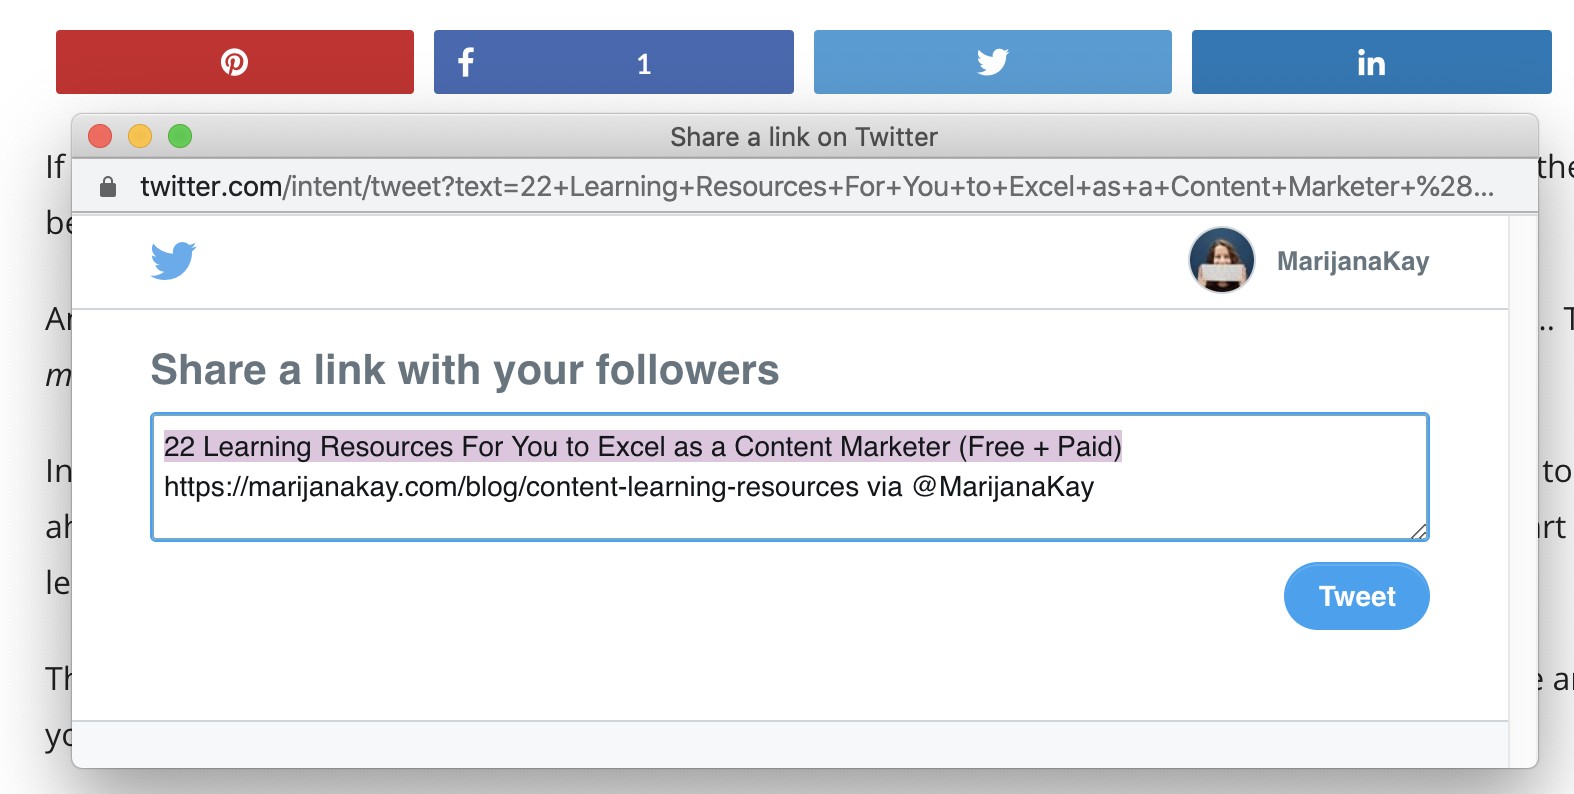
22. Add social sharing buttons
Social sharing buttons are another action that falls into the category of ‘if you don’t make sharing easy, no one will share.’
This is more a one-and-done action than a recurring one, but it’s worth giving it a quick check every time you publish.
For example: make sure your social sharing buttons aren’t covering a graphic or a part of text (especially on mobile), check they’re working, and make sure they’re auto-populating the text you want there (such as your Twitter handle).
23. Reach out to companies and people you’ve mentioned
The most organic, yet efficient way to get in front of new people is by borrowing audiences that someone else already established.
When you feature other people and companies in your blog post, let them know you’ve done that! You can do so by:
- Tweeting at the company
- Tweeting at the founder or someone else from the company that’s active on the platform
- Emailing the person you’ve mentioned
It’s important to note: don’t be pushy, sleazy, or expect a favor in return. To me, that doesn’t feel genuine. Feature someone because their work and examples are valuable to your audience; don’t clout-chase.
Results in the form of traffic will come naturally and over a longer time.
24. Send an email to your email subscribers
If you have a list of any size, let them know you’ve created something for them!
Whether you’ll add your new blog post to a regular newsletter or send a dedicated email just for your blog post is entirely up to you.
Get inspired by other examples you like. Some of my favorite emails in my inbox are those by Amy Hoy of Stacking the Bricks. She doesn’t just link to the post and calls it a day—she shares most (or all) of it right there, with a link at the very end.
Find an approach you like and test it!
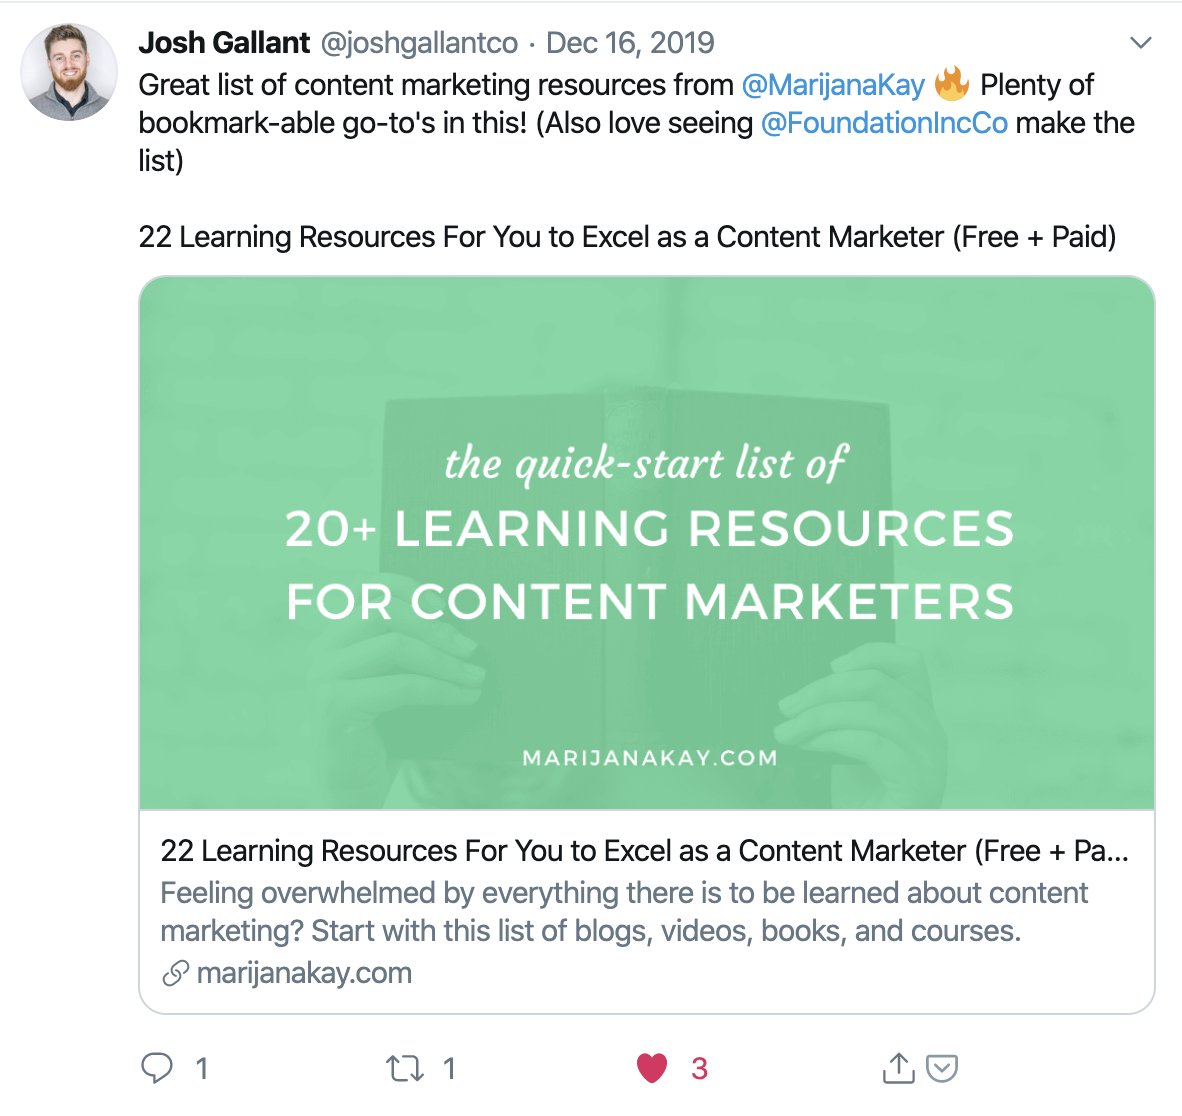
25. Create a list of snippets for social media posts
If you’ve published an evergreen post, make sure you’re resharing it for months and years to come.
To make this easy, go through your blog post and build a list of takeaways, quote, stats, and any other snippets you can use when sharing. This can be as simple as a Google Doc of all your shareable snippets.
One of my favorite examples is from Animalz’ Jimmy Daly. He broke his 50 tips on growing a blog with content post into 50 actual snippets and shared them on Twitter.

You can do this for any topic. Start by creating 4-5 snippets for your blog post and see if you can build more over time.
Download your high-performing blog post checklist
That’s it! If you want to streamline this process, be sure to grab your free, 1-page checklist to use with every blog post.
Reminder: you can turn these items into a template checklist in your project management system and assign them to the right people on your team for maximum efficiency.
Let me know if you have any suggestions for this checklist! Good luck 🚀
PS Pin this post so that you can easily refer to it later:


Andrew
January 22, 2020 at 2:43 pmThis is such a comprehensive but easy to digest guide. Thank you! The PDF is now tacked up behind my computer.